Wednesday, October 30, 2013

My little mermaid costume


For Halloween last year my 4 year old decided she wanted to be #Ariel, the only princess that she didn't already have in her bin of dresses.  Since I have vowed never to buy a #cheap, itchy,# made
in china, #one size fits all, unoriginal, #Party City #Halloween costume, I decided to make it from scratch. I typically make our #costumes home made but usually I draw the line at #hot glue for seams.
This costume would require some sewing to make it fit right. Just a simple stitch with # no sewing machine would have to do for sewing is not one of my trades.
When I make a costume I usually have a few reuseable items from home for my inspiration. This is what I had to start:

  • 1 Ariel fancy beaded tiara 
  • tons of seashells I have collected
  • a cheap, elastic waisted, #purple tutu from # Michaels
  • purple magic wand thingy
  • needle and thread 
  • of course hot glue & gun
  • yard stick

I went to the #Yardage Town the fabric store armed with a 30 percent coupon and an open mind. I aimed to make a #fin/skirt, a top, a cape and a septor/ microphone. I tried to find a pattern but they only had an ugly mermaid dress.
 Here is what I bought all in 1 small, local shopping center ;

  • 1 yard of teal, stretchy, velour fabric for the fin/ skirt 
  • 1/2 yard of lavender, stretchy, velour material for the top
  • 1/2 yard turquoise net would be used for fin and cape 
  •  an Ariel patch for the top
  • 1/2 tard teal sequin trim
  • 1/2 yard green elastic sequin bands 
  • Gold sparkly shoes found at second hand store
I will now try to show how I made the costume:


Cut 2 same size pieces for skirt out of teal velour.
Measure from waist to floor and slightly taper towards feet.
Turn pieces soft side in and sew each side with an over/ under stitch
leaving a slit on each side for walking.
Hem a  long ribbon inside top of the skirt leaving a short slit in the back for ribbon to come out and tie together to allow for loosening and tightening.
Cut tutu in half and stitch onto top of teal skirt, leaving back slit open.

Cut 2 tank shapes and turn soft material facing in.
Sew together the sides with over under stitch leaving armpit. tummy and neck holes.
Sew together shoulder straps and turn right side in.

Hot glue Ariel patch in the middle of top.
Cut 2 pieces of teal sequin trim for neck embellishment.
Hot glue trim to front and back of neckline.


For the fin, get the blue netting and measure around the calf (enough for bunching so child can walk)
Cut large rectangle piece and fold in half .
Cut and measure piece of green, elastic, sequin band loosely around calf.
Hot glue folded netting onto sequin band in gathers every inch.
Sew fin onto velour skirt at mid calf, leaving room in thread length/stitch, to walk.


For the Cape use left over velour piece and cut to large rectangle.
Cut 2 small pieces of leftover blue net.
Hot glue them in gathers, to soft side of a strip of teal velour (long enough to tie around neck loosely).
Glue a small piece of teal, sequin trim over net and velour strip.
Glue or sew net strip to the large velour rectangle in gathers.


Thursday, February 28, 2013

'Spa' day at the beach

A beautiful sunny day in Encinitas can only lead you to one place.... the beach. For the kids its a great way to let them run and play freely. For you it is a workout to get there and home and you can hope for a little rest and a tan in between. Childhood memories helped me recreate this idea for to keep my daughter happy, clean and close by.
My father the cop used to flex his guns and get dirty for us, digging out the coolest jacuzzi. It was huge, complete with seats, a step and deep enough to stand in. My spa is a litlle less extreme but provides hours of giggles.
Once you have set up camp you can start digging your hole. Depending on your kid, the hole should be about 4- 6 feet in diameter. Digging is a great ab workout... On both knees face hole ( sounds good) and pull dirt toward you with both hands and move it away form edge. You will need these piles of sand to secure your plastic. You will look ridiculous but who cares it pays off. I suggest making your hole close to your camp and making a step for little ones to sit on in the water. If on the slope have the step towards the water.
The trick to keeping the water from drying up is the heavy duty plastic. This can be found at home improvement stores or made from heavy duty yard trash bags. Plastic needs to be cut much larger than the hole about 10-12 square feet. Lay the plastic in the hole and pile the sand on the corners sticking out.
Now its time for fill up, the next workut and we put the children to work. Get the buckets and head back and forth to the water.
It is a lot of work but the kids can hang out in there forever and you can always have a place to rinse hands and toys at the end of the day. That is as long as they dont poo in the pool.
People will walk by and envy your pool. sure you Here is a beach checklist to make sure you dont forget the important stuff and can spend the entire day.
  • lunch, snacks, ice in a small cooler
  • blankets, towels
  • umbrella if not windy
  • sand toys, big buckets, shovel one large
  • surfboard/ boogie board
  • sunblock, chapstick
  • hats, glasses
  • diapers, swimmers
  • chairs
  • camera
  • change of clothes
  • wipes/ paper towels
  • water
  • small trash bag
  • Large circle of painters plastic


3 year old Bubble Guppy birthday

With creativity, patience, stock craft supplies and a photo printer I made my daughters 3rd birthday one that she and everyone else will remember. If this is the theme you choose for your child keep in mind there is no merchandising for this show.
 I first tried to print my invitations off of the nikjr website. That was annoying because the website would freeze before printing so instead i went to google images.
                                                                              Happy Birthday                                 


 Place:
 Date:
 Time:
 RSVP
Our little mermaid is turning 3
and she wants to be a bubble guppy.
Come and help her celebrate
                                                                   with a party on her special date.
                                                                   Join us for games, lunch and fishing
                                                                   along with cake, candles and wishing.
I printed the picture on cardstock
and the printed text on regular paper.
I made smaller rectangles with text and
glued to back of picture. Mailed out in
 colorful envelopes.
    For the childrens games I came up with some gender and age neutral ones:
Fishing-  The poles require a little effort and some interesting supplies-
  • Plastic pool
  • 6-8 dowels that are 18 -20 inches long
  • acrylic paints- dark blue, turquoise, pink, purple, orange, green, yellow
  • 6-8 zipties
  • electrical tape
  • trimmer line or heavy duty fishing line
  • Magnets bought at Radioshack.com -10- rectangle and 10- 1/4"circles- sold in 5-packs
  • hot glue gun and glue
  • super glue
  • 10-14  Fish and other aquatic bath toys that will hold the other magnets
  1. Paint dowels each a different color- 2 coats and let dry
  2. Cut pieces of trimmer line 34- 36 inches long- 6-8 of them
  3. Secure line to dowels with zipties and leave excess
  4. Wrap excess around dowel and line with electrical tape so it is flush with pole
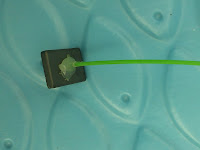
5.   Thread rectangle magnet onto line.                   6.   Glue large drops on end of line to stop magnet from dropping off.                                                   7.    Glue top of magnet to secure from sliding up. 8.     Glue magnets to tops of fish with super glue.


The next thing I made were 10 inch cutouts of all of the bubble guppies.Download all of their pictures on off google images and print then cut out.

  • 8 x 10 inch card stock
  •  a color printer
  • scissors
I made a birthday banner by hand.


  • leftover colored cardstock,
  • bubble letter stencils
  • hole punch
  •  glue.


  1.  Draw h-a-p-p-y b-i-r-t-h-d-a-y with bubble font 
  2. Cut out 13 circles of opposite colors. 
  3. Glue letters to circles and add some turquoise tiny circles for bubble accents. 
  4. Hole punch circles and connect with ribbon or fishing line.:


Bubble Guppy inspired food:


  • Goldfish crackers-rainbow, graham, chocolate
  • Fruit plate and vegetable plate with dip
  • Tilapia fish strips
  • Goldfish topped macaroni and cheese
  • Adults choose between Shrimp cakes, portobello burgers and turkey burgers served with small buns
  • Mr. grouper fish cake with bubble cake pop drops
  • Sundae bar


Bubble guppy magnets

About Me

My photo
For 20 years I have been teaching and coaching people of all ages in the sports and recreation industry. I have done everything from choreographing dance assemblies to personal training college athletes. I have worked at schools, country clubs and in the home settings. I have also worked in the food and beverage industry bartending and serving. I have decorated and catered for high end clientele. I am a married mother of one and I love to throw budget friendly parties for kids and adults alike.